
Throughout its service with UKSF, the L119A1 has been painted all sorts of colours depending on theatre, resources and the preferences of individual operators, from carefully put together and almost artistic patterns to (more usually) rough and ready application of paint to break up the outline of the weapon.
The L119A2 it seems is no different, with approximately half of those seen in use with UKSF so far having been painted a variety of patterns.
There’s certainly nothing wrong with leaving them unpainted, as issued, but some guys just love painting their rifles, and others won’t particularly like the ‘two-tone’ effect the tan/dark earth parts lend the L119A2.

This article will try and draw out broad themes with the painting of weapons, and usual caveats apply regarding the still small sample sizes in terms of L119A2 reference, although it is getting better in that regard. It is also worth noting that while I will mention general themes here, painting of weapons is hugely individual, and will remain so in most cases. Colour choices, method, and level of prep will differ between users, and many building replicas see painting as a way to exercise another level of creativity, or make builds appear more authentic.
Yet again photoshop has been deployed to illustrate things which are shown in images I have undertaken not to share. Photoshop has also helped add a degree of clarity to the patterns shown, and comparison between them, which might otherwise be lacking.
Shades of tan and brown are still predominant, as with the L119A1, although there is perhaps abit more green now added to paint jobs, possibly a reflection of focus slowly shifting away from sandy theatre’s, although it is evidently not far.
Generally I have found the below to be useful considerations when painting anything.
- Consider what not to paint. Mask off areas of the item which you do not wish to paint – it is up to you how precisely or roughly you do so, that will depend somewhat on the type of paint job you want to deliver, but as a general rule, don’t paint flash hiders, bolts and triggers – certainly don’t paint lenses on lights and optics. Consider which accessories you do and don’t want to paint, not painting an accessory or even an item of furniture on an otherwise painted gun can give it a ‘dropped in’ look. Painting accessories on the weapon (so there are gaps in the rails when they’re removed) is also another style which can give a particular look – it’s been seen commonly, but it’s also obvious some guys remove every accessory and paint separately. Apparently this may in part be to do with ensuring there is no paint on rails where accessories need to be zeroed, although is has also been seen on flashlight and grip attachment points, so in some cases it must simply be guys not bothering, or wanting, to remove accessories before painting.
- Personally I always use a range of paints from different manufacturers to get the colours I want – I think using entirely Krylon can often seem very ‘airsoft’. Krylon, Fosco, Tamiya and NFM are all good choices. Paints used by the real guys will be from various sources, and might not look too much like the small range at a local airsoft shop. Don’t go overboard with 10 different colours though, no one has time to do that for real.
- I always like dark brown Krylon for a base coat, and will have mid earth and tan colours over, then darker browns and a green to finish off. I tend to suggest avoiding light base coats, and don’t overuse tan Krylon.
- Don’t do the ‘dusty look’ – it never looks good, it is always too consistent, it is fine to have a weapon which has had multiple paint jobs chipped and flaked off, but real operators don’t let their weapon look like it’s been through a cement mixer.
- Unlike many people I am not against artificially wearing a paint job, even if you airsoft religiously you likely won’t put a rifle through a fraction of the use a military rifle gets, so to avoid it all looking too pristine, artificial wear can be useful. The problem is that almost everyone does artificial wear badly. Paintjobs wear in a variety of ways, surfaces which are touched constantly in the operation or cleaning of the weapon will wear down naturally. Flat surfaces will often scratch, exposed ridges will chip – some in more protected areas will remain untouched – good artificial wear will replicate all of them, and consider where the wear will realistically occur. Don’t use white spirit or anything to wear a paint job. Handle it when the paint has only just dried (not when it is tacky, or it will leave smears and marks) – run through a few drills, rub the paint where you usually touch and hold the weapon, dabbing with paint stripper gel can make it look like an area has naturally worn, but it’s strong stuff, a few dabs with a gel soaked J-cloth, then a minute or so later wiping it off with a dry one often works well. A kitchen scourer is often good at scuffing and knocking paint at exposed areas, the edges or rails, mag wells, projections, edges of iron sights, sling mounts etc before paint is fully dry. Don’t go knocking or scuffing it from areas which wouldn’t normally get a decent amount of abuse. A few scratchs and chips to dry but not completely cured paint can be achieved using a plastic ruler, don’t use anything too hard since you don’t want to scratch the surface below, and concentrate here on flatter surfaces like on the receiver where it might scrap against a branch or rock. Also don’t be too concerned about everywhere on a rifle being equally worn – consistency will look artificial.
The below images have been based on real reference photos – not every spray and dab is replicated, but the general themes of the various paint jobs are featured in reference photos.
Please ignore the choice of accessories on the rifles, and whether they are painted or not. With the exception of the rubber hand guard and flash hider, in reality the mags/BUIS/sling mounts etc could be painted or not, depending on preference. The choice of accessories is simply what was on the base image I worked from.
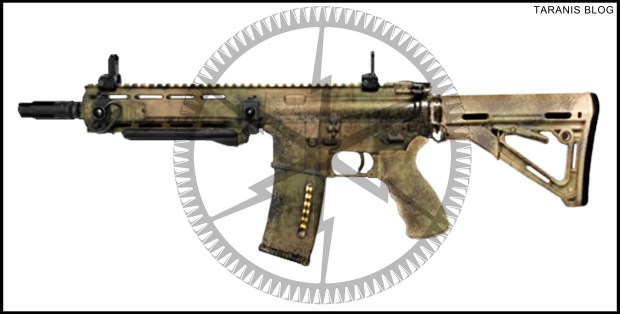
The first is a simple 3/4 colour pattern using a couple of tan/earth colours, a darker brown, and a mid green, with no major use of any stencils or scrims.
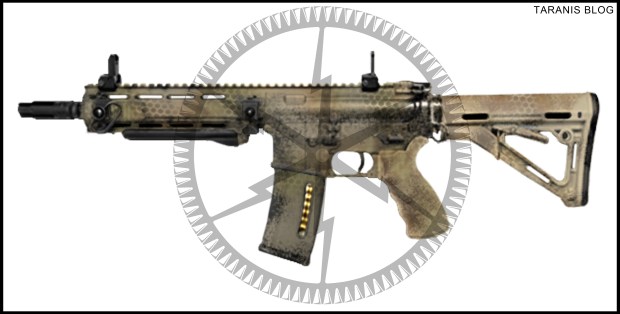
The second shows a lighter tan scheme, with darker brown and/or green applied in splashes of spray through a scrim. Army laundry bags give a great honeycomb pattern (my personal preference), while scrim scarfs will give a more rectangular ‘scale’ like pattern.
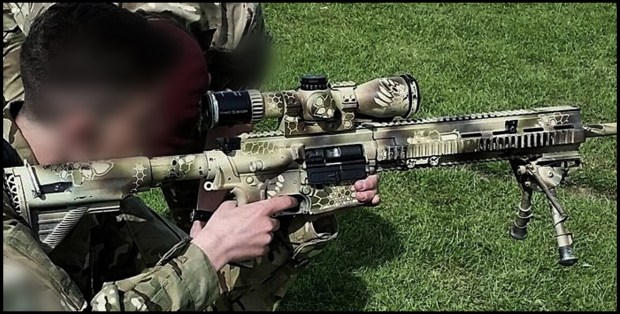
This is where things get a bit interesting, and different from L119A1s – L119A2s have been seen sporting Kryptek inspired paint jobs. This seems to be a combination of more traditional paint techniques over stuck on Kryptek stencils, as sold by Ballistic Designs IOM via their website and Ebay. These stencils are stuck down over the base colour you would want the pattern in, the paint job is continued over the top, and then finally the stencil stickers are peeled off to reveal the pattern below. If going for this method, don’t overdo it, every inch of the weapon shouldn’t be the Kryptek pattern, just flashes of it.

I’m unable to share pictures of L119A2s with Krypek paint jobs, but the below SFSG HK417 gives an indication. This one looks so sharp I initially thought it was a hydrodip, although it is in fact paint, the A2s seen appear a little less striking. The method certainly appears to be in vogue among the real guys though, and can look awesome.
Finally, although not a spray job per say, Cerakote is something many use to finish receivers after having modifications made of engraving done, and it gives a thin, hard wearing and consistent surface finish. Most often this is simply back to a black colour – however there is another option if doing a signals kit.
Signallers attached to other UKSF elements from 18 Signal Regiment use L119A2s which have had their receivers duracoated FDE, with suppressors and optics also cerakoted. Ergo grip and CTRs are retained in their stock colours, magazines appear to remain black, and pins, controls and sling plate are also black – the buffer tube and nut however seem to be coated.
This believed to be particular to signallers due to restrictions on painting their weapons, and so would represent a unique touch for those building signals impressions.
This article was edited for after new information came to light post publication. Check out the addendum to see what changed.

One comment